Part 1 - Create "living" documentation of design tokens
What you need to know to feel confident creating and maintaining "living" documentation of design tokens using Tokens Studio and Automator.
Hi Designer, Sam I am here 🫶
In part 1, I will walk you through some context on documenting design tokens and how to set up your Figma files to automate the process using Tokens Studio and Automator.
This guide will work on both the free and pro licences of Tokens Studio, and Automator is now free!
Part 2 is a separate blog to cover running the Automator script and keeping your documentation “alive” using Tokens Studio.
👀 Watch the full YouTube video or scroll down to read through the process.
Map of contents
What you need to know before you get started
This guide assumes you know how to use Tokens Studio, have already created design tokens, and are ready to document them.
I’ll be using “docs” as a short form of “documentation,” but they mean the same thing.
The documentation problem to solve
If I asked you, “How is design token documentation created? How is it kept up to dates when design decisions change?” you’d probably say something like:
“Docs are created by copy and pasting token names and values into a text document. When a token changes, I have to go into the document and edit the text”.
But, it's 2024 and ain't nobody got time for “static” documentation that requires manual effort to update.
Or if you aren’t a design team of one working for a scrappy start-up, you might say something like:
“We use a 3rd party tool that reads design tokens in code and produces living documentation for us we can access from a website.”
Fancy… I want docs that update themselves!
But I’ve never worked on a team with that kind of budget.
And honestly, as a designer (with ADHD), I want to reference my component docs as I’m using my components in my design tool. If I have to leave Figma to go to a website to read docs, I’m for sure going down an unrelated rabbit hole, which is far more interesting than reading design docs…
So how can I, as a design team of one, or anyone working on a team without a budget for these fancy tools, create living documentation in Figma?
What is “living” documentation?
“Living” as an expression means once it’s created (or brought to life), it can continue to “grow” (or change) with just a little love. Kind of like a house plant that needs water every now and again.
Living documentation, in this case, means we create the documentation for our design tokens, and whenever the design decisions are captured in the token change, you can automagically update the documentation with a couple of clicks.
Including living documentation in your workflow saves a ton of time keeping design token docs up to date.
Lucky for us, Tokens Studio has features that can create static and living documentation in Figma, which are helpful to understand before we automate the whole process.
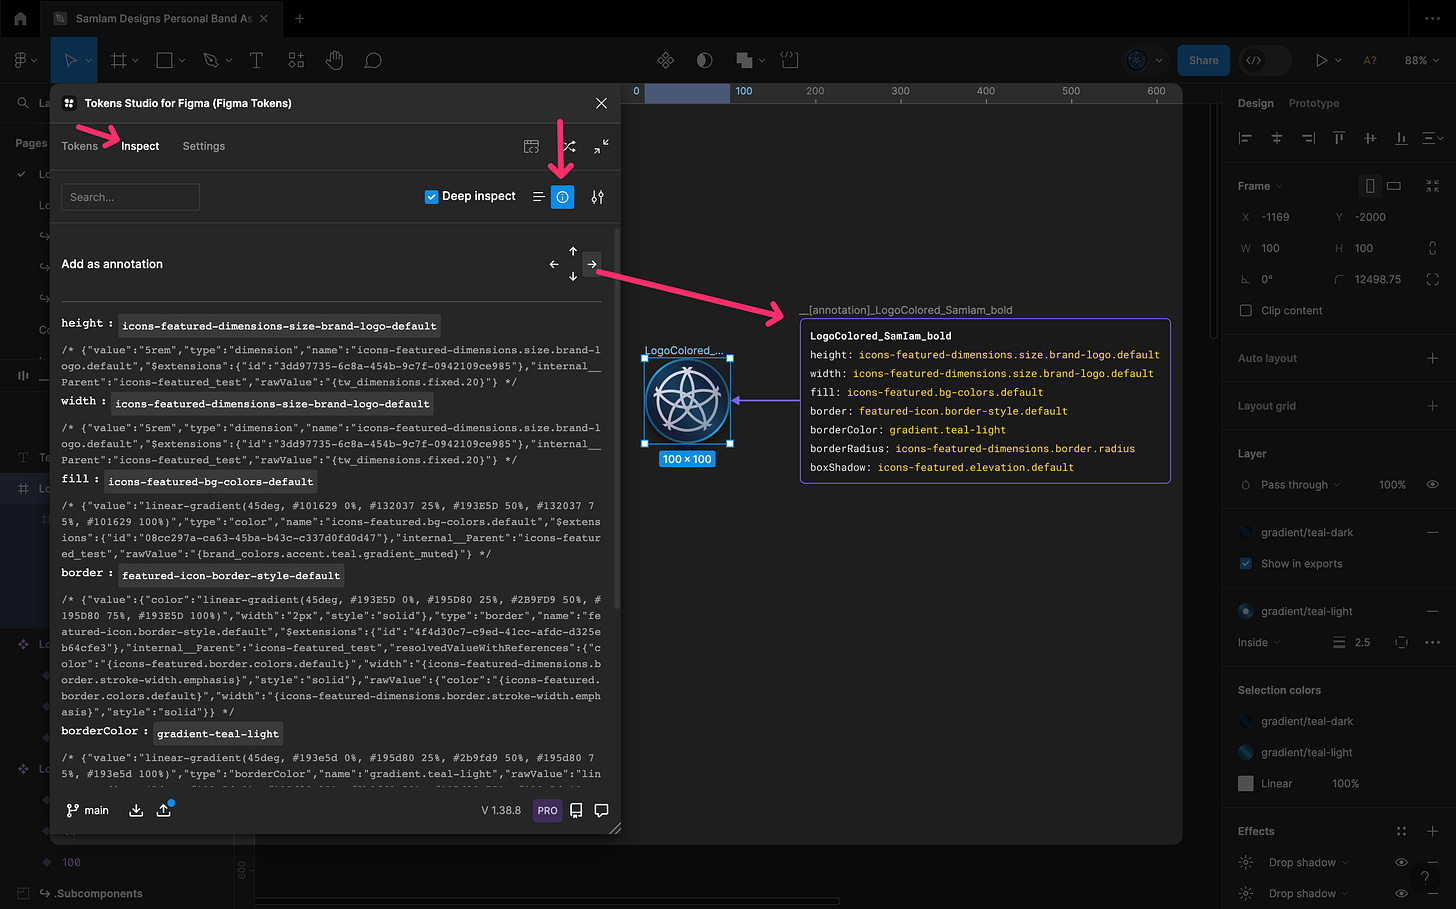
Annotations in Tokens Studio are "static"
In Figma, open the Tokens Studio plugin and select a design element on your canvas.
Navigate to the
Inspect tabSelect the
"i" info icon"Select an arrow next to the
Add as annotationlabel
This is pretty cool, but unfortunately, the output here is just a layer-by-layer way to produce static documentation. I’d have to repeat this for each layer in my design and re-do it every time something in the design tokens changed.
I also can’t see what the value of the tokens are or how I arrived at these design decisions.
Honestly, some tools do this way better; Eightshapes Specs by Nathan Curtis, I'm looking at you.
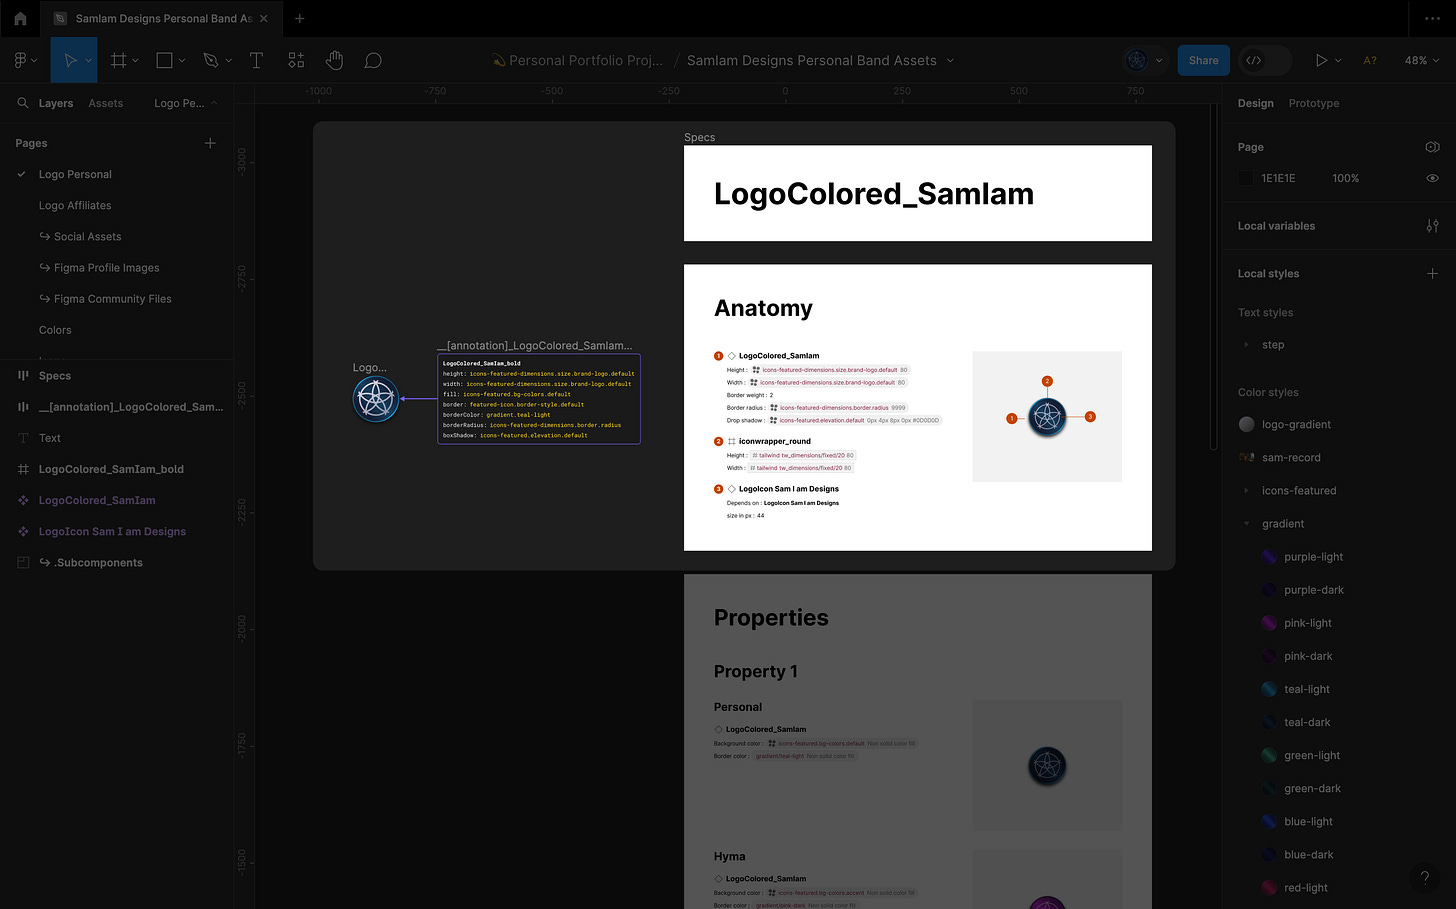
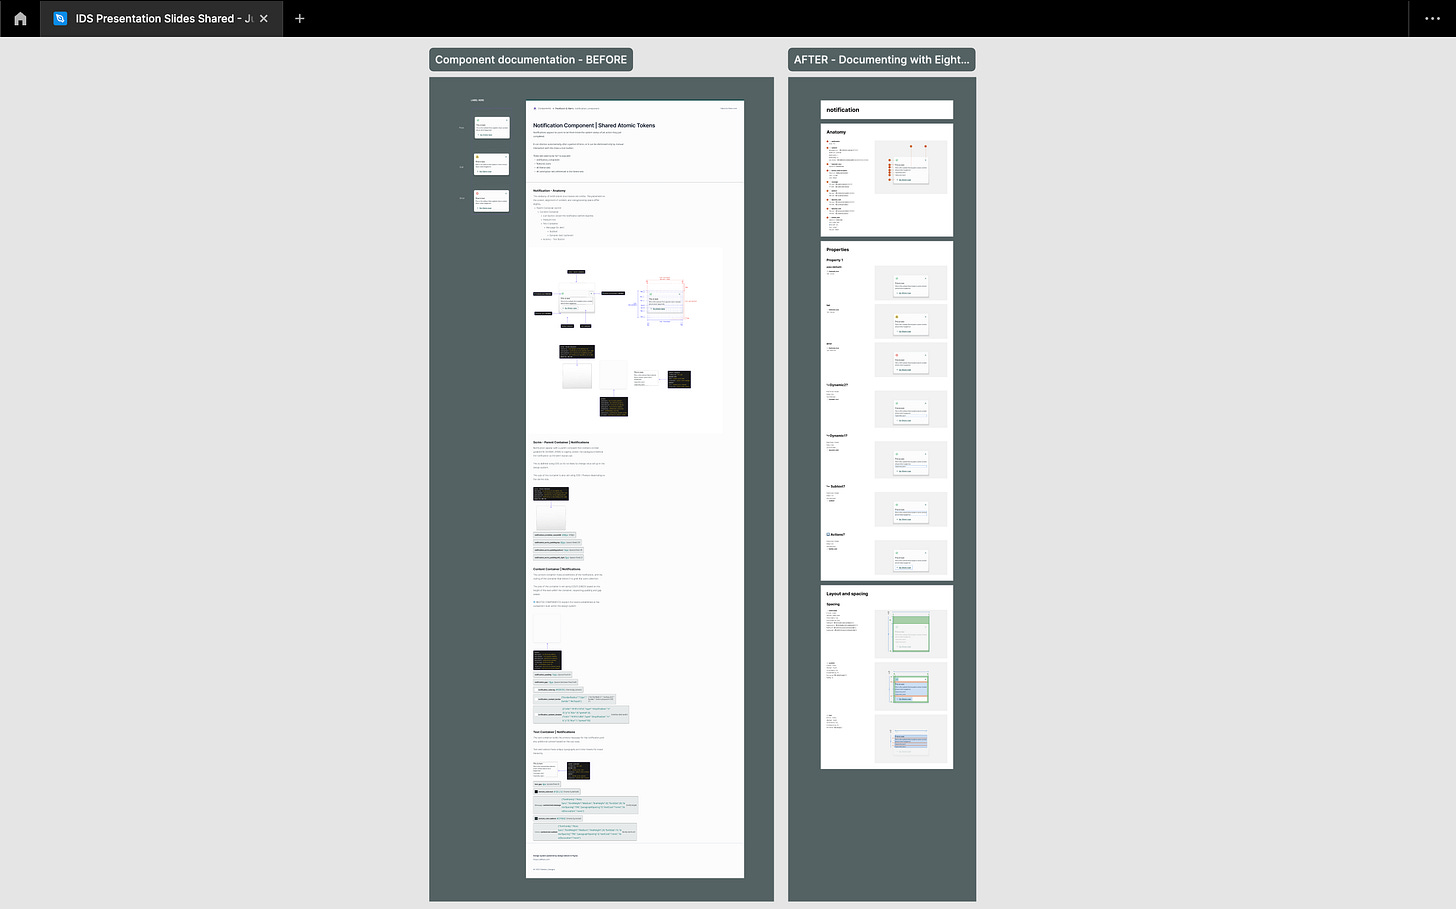
Even with living documentation, I still use the Eightshapes Specs plugin to create a “snapshot” of my tokens with a single click, and the redlining feature is such a time saver! Even at the under $10 per month cost, it’s a small price to buy back a ton of time! I can’t even tell you how long documenting sizing and spacing used to take when I would do it by hand 😫.
Documentation tokens are "living"
In Figma, open the Tokens Studio plugin and select a text layer.
Right-clickon a design token to see its menuSelect
documentation tokensSelect an option, like
token name
The documentation token will replace whatever placeholder copy is in my text layer with the data from Tokens Studio by attaching a token to the text layer.
This means when the token is updated, I can also update the text layer to see the change in just a couple of clicks.
But (trust me on this one) it can be very time-consuming to do this one by one. If we wanted to create a simple colour swatch, we would need to repeat this step 3-4 times for every token in our system. Which, even at just the primitive options level, can be a lot!
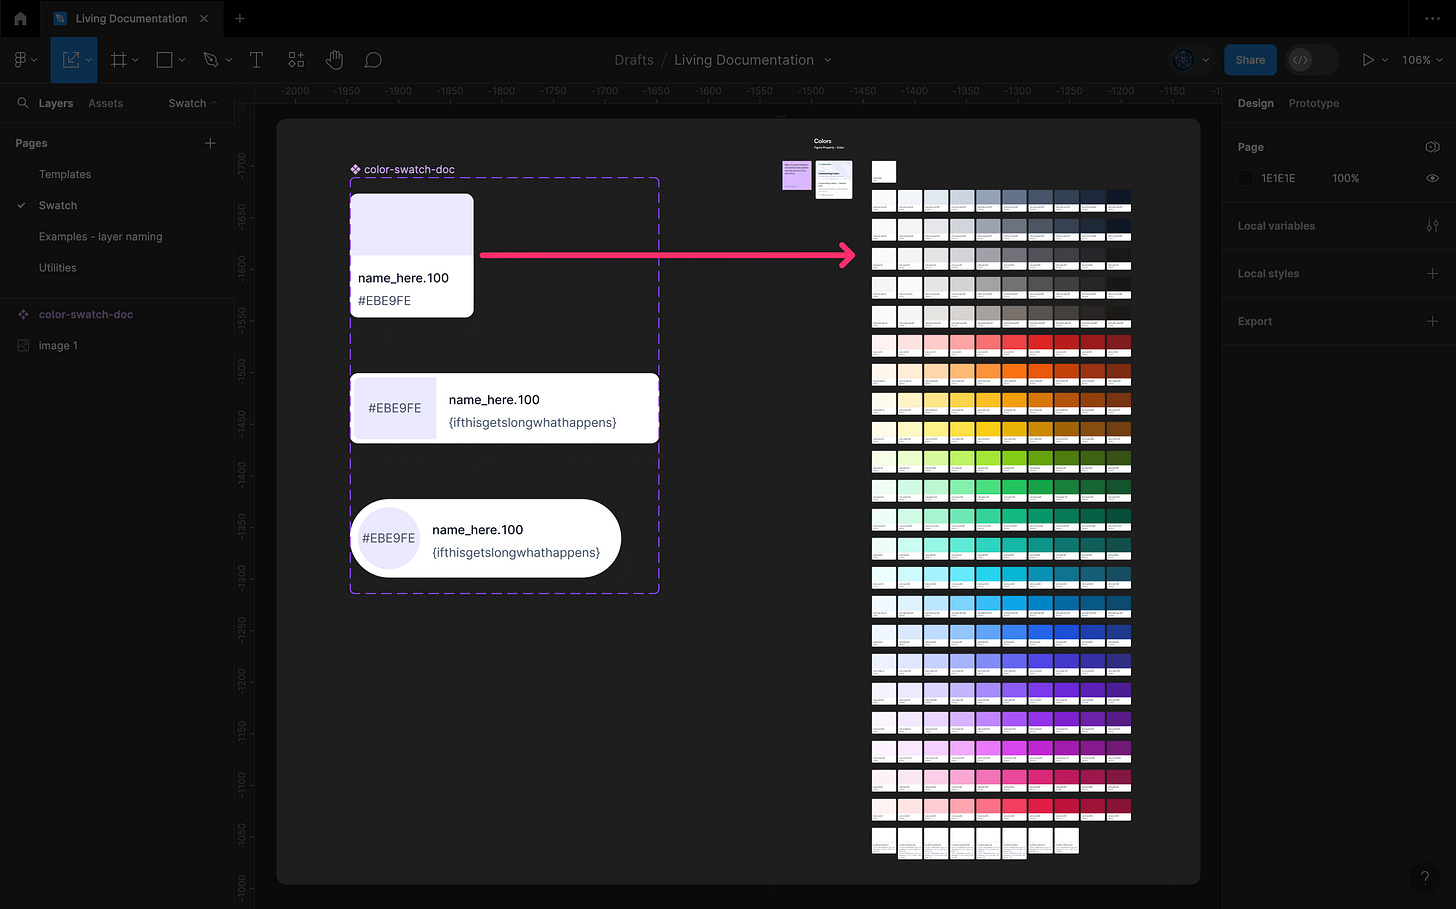
To automate the process of creating living documentation, we can use the Automator plugin for Figma with Tokens Studio.
What is Automator?
Automator is a plugin for Figma that allows you to build automation scripts. Anything you do in Figma as a repetitive task could be done by Automator instead. It used to be owned by a company called Diagram, which was bought out by Figma. So now, anyone can use Automator for free, which is awesome!
Don’t worry, the Automator script is already written for you!
Jan Six, the creator of Tokens Studio, wrote an Automator script for the community a few years back, and I’ve modified it slightly to collaborate with him on the 2024 version.
The script tells Automator to look at a template we’ve formatted with specific named layers and map those layers back to token properties, like token name, value, etc.
We tell Automator which token set we want to document, and it duplicates our template for each token in the set, attaching our named layers to the token properties. When we run Tokens Studio, the templates are populated with the most current token data.
So now that we’ve covered some basic context, let’s get the Automator technical setup done; then, we can prep our templates to work with it.
Plus, I've published my favourite personal doc templates to the Figma community so you can get a head start. 😉
Step 1 - Automator + script setup
If you are familiar with adding plugins to Figma, this part will be easy.
👀 Watch a YouTube video for this part - Coming soon
Downloads
Save the Automator plugin from their Figma Community page to your Figma account.
Download the Living Documentation for Tokens Studio script
Originally by Jan Six - creator of Tokens Studio but I’ve modified it and collaborated with Jan to release the 2024 version.
Setup in Figma
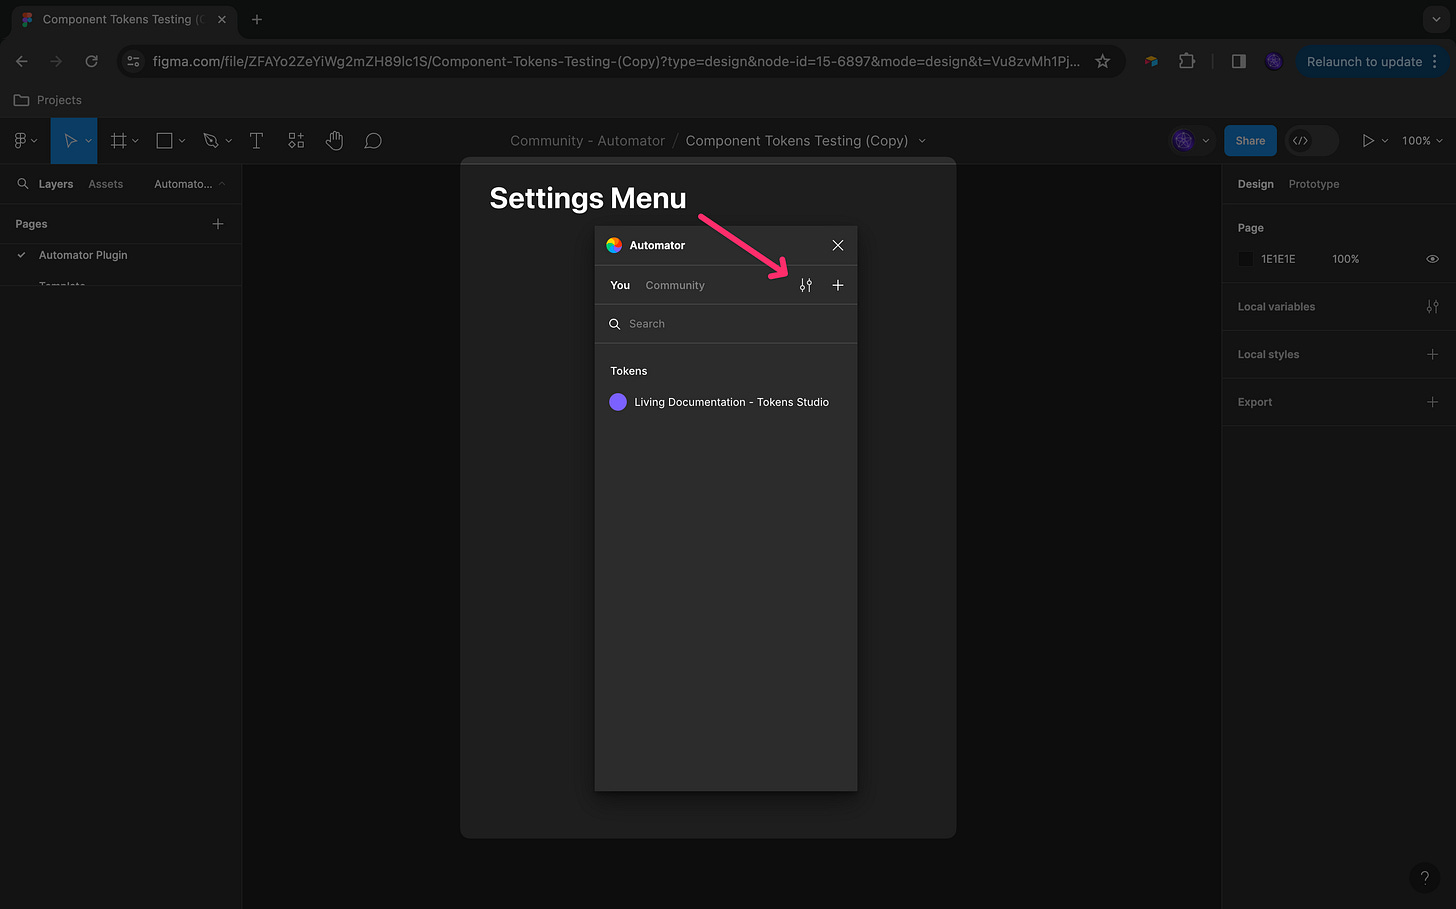
In Figma, open the Automator plugin (short key: cmd/ctrl + p)
Select the
settings iconSelect
import JSONSelect the
script fileyou downloadedSelect the
edit iconChoose a color you like
Rename the folder/scriptas desiredSelect the
back iconto finish
Step 2 - Documentation template setup
The automation script works with these design elements in Figma:
Text layers
Primarily for written docs of token properties utilizing the documentation tokens mentioned earlier.
Visual preview of typography tokens for text styling.
Frame layers
Visual preview of token properties, like when we filled a frame with our color token to create a swatch alongside the hex code.
Create your templates
You can create your own templates from scratch, or download my {Figma community file} to use one of mine.
Design your templates however you wish. You can:
Add additional text layers for labels
Wrap your layers in auto layout frames for nice formatting
Keep in mind the script can only apply 1 property per layer.
So if you want to show a visual preview of a color token that can be applied to:
container background
stroke/border
text
You’ll need to create a layer for each in your template.
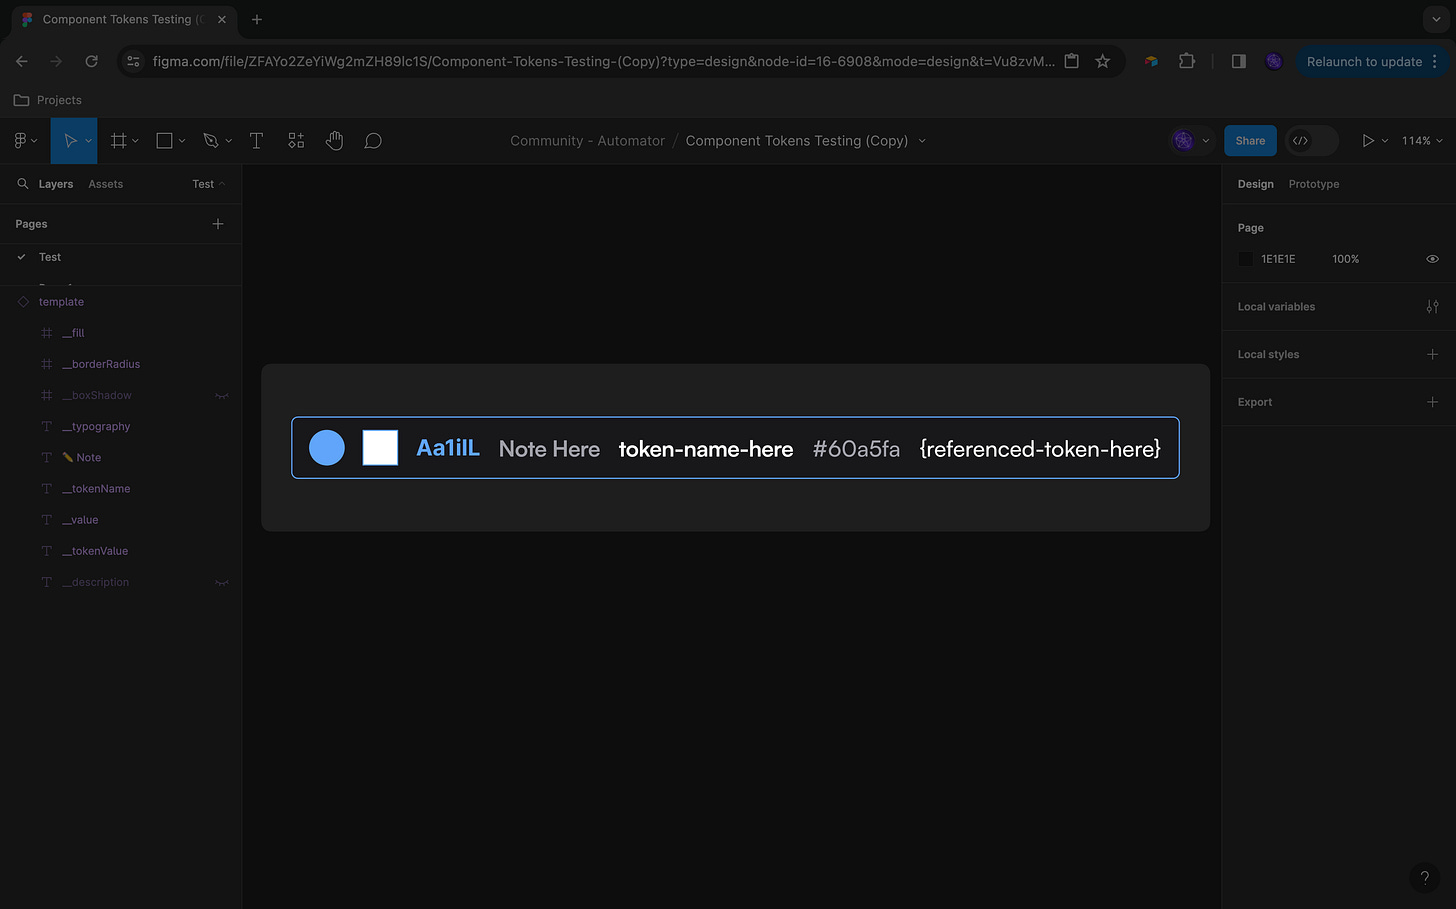
Rename your layers
This isn’t the time to defend which side of the “should designers spend the time to name their layers” debate you are on because this is a requirement for the Automator script to work. 😜
According to Jan Six who wrote the original script:
"Create template layers that match any token property with two underscores (_ _) so the plugin will pick it up...basically any other property that Tokens Studio supports."
Which is engineering speak for:
The script is looking for layers with names that are exact matches to the design properties of the token we are trying to document.
For example, if you have a:
frame layer named __tokenValue
The automation won't work! The __tokenValue property in Tokens Studio is mapped to a documentation token, which we already learned needs a text layer to work.
You can take a look at the templates in my community file for reference or you can copy the code blocks below.
Written documentation - text layer names
__tokenNamecurrent token name (including groups)
__tokenValuethe raw value exactly as it exists in the field.
Use to show references, math, etc
__valuethe resolved value of the token from references, math etc
__descriptiondisplays whatever is entered in the optional field
NOTE: If you have equations in this field, they will resolve
Visual previews - frame and text layer names
__fillapplies a
color fillproperty fromcolortokens toframe layers
text layers (applies to glyphs)
__borderColoradjusts the existing
stroke colorproperty fromcolortokens onframe layers (stroke applied)
text layers (stroke applied)
__borderWidth
adjusts the existing
stroke widthproperty fromdimension,number, orsizetokens onframe layers (stroke applied)
text layers (stroke applied)
__borderRadiusapplies the
corner radiusproperties fromdimension,number, orborderRadiustokens totext layers
__boxShadowapplies any
shadow effectproperties fromboxShadowtokens toframe layers
text layers (glyphs)
__typographyapplies
text stylingproperties fromtypography tokenstotext layers
Bonus tip - how to find additional token properties
Remember how Jan describes his script as being able to work with “any token property”? This means as Tokens Studio expands its token types and properties, the script should still work. So here is how you can find the exact text string of any token property from the plugin to create a template the Automator script can use.
Design your template as desired
Open the Tokens Studio plugin
Manually populate the template with tokens, ensuring only one token is applied to each layer in your template
Select the layer you want to find the token property for
Navigate to the inspect tab in the plugin
Ensure deep select is inactive (empty square not checked)
Pay attention to the heading above the token value and name; this is the token property text string we need!
Carefully select the heading and copy it (cmd/ctrl + c)
Paste the token property into a sticky note, text layer, notepad etc.
Add the double underscore as a prefix
This is the new layer name you can use in a template that Automator will pick up
For example, I have some dimension tokens representing breakpoints, and I want to create a visual preview similar to blue bars in this screenshot.
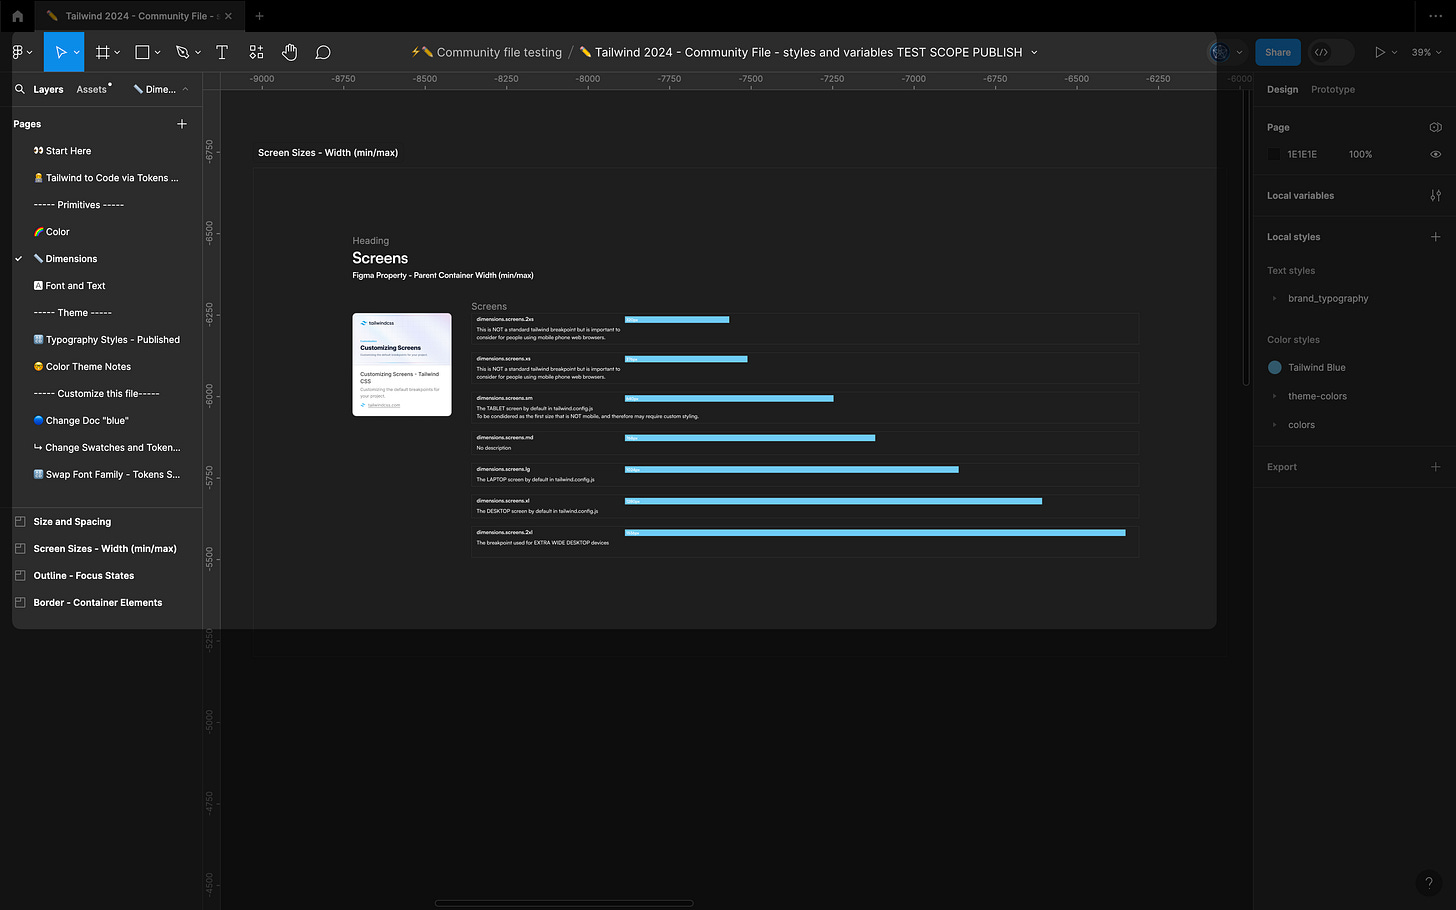
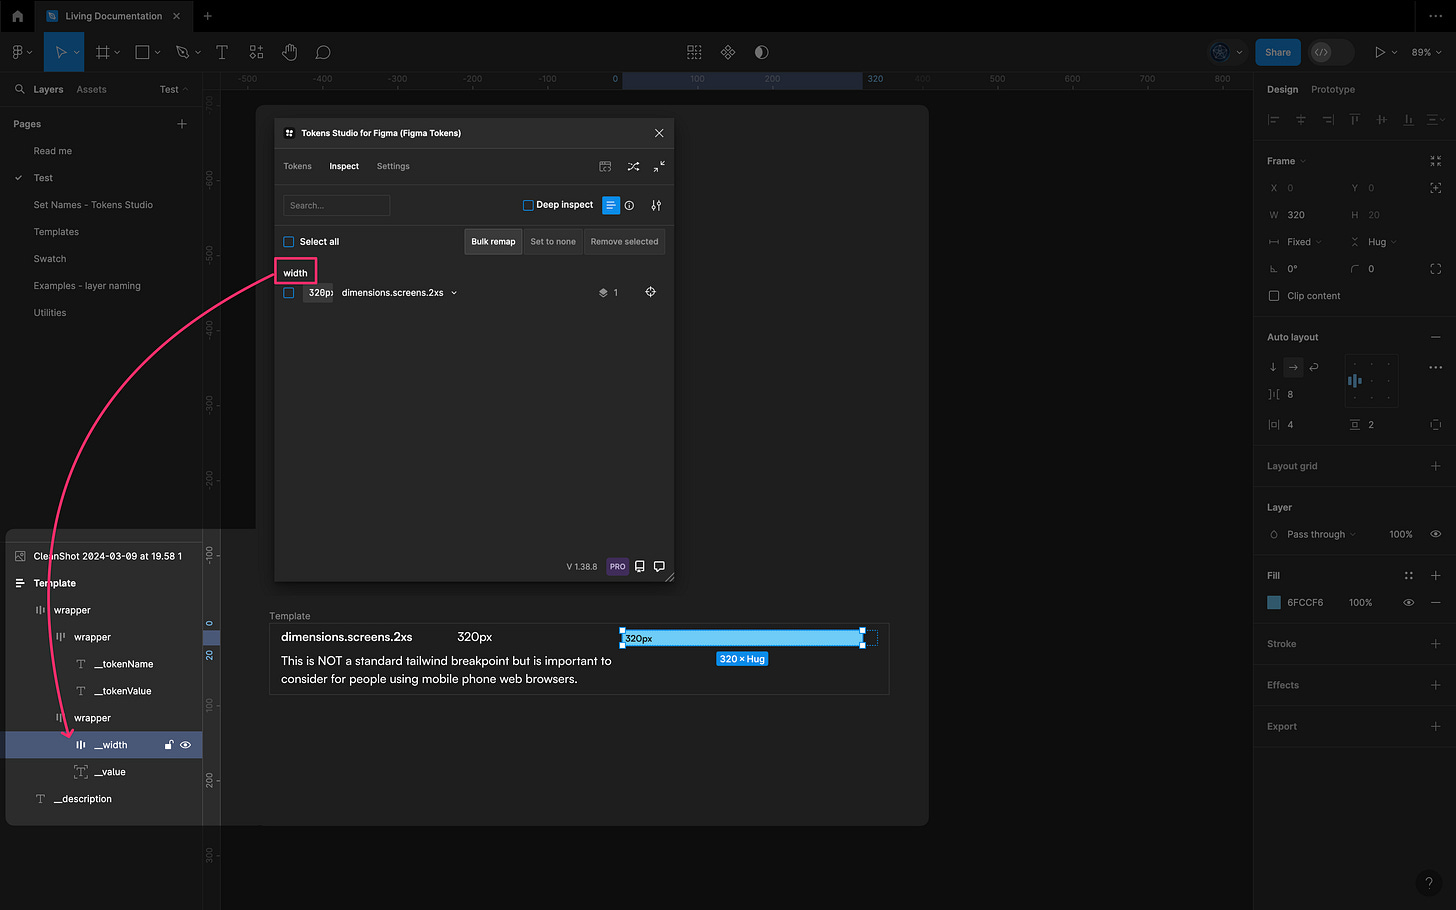
I would build the template with the “blue bar” as a frame layer, and apply the dimension token as sizing > width.
When I inspect the “blue bar” frame layer in Tokens Studio, the heading on the token data is “width.” So my new layer name for my living doc template is “__width”.
Consider component properties
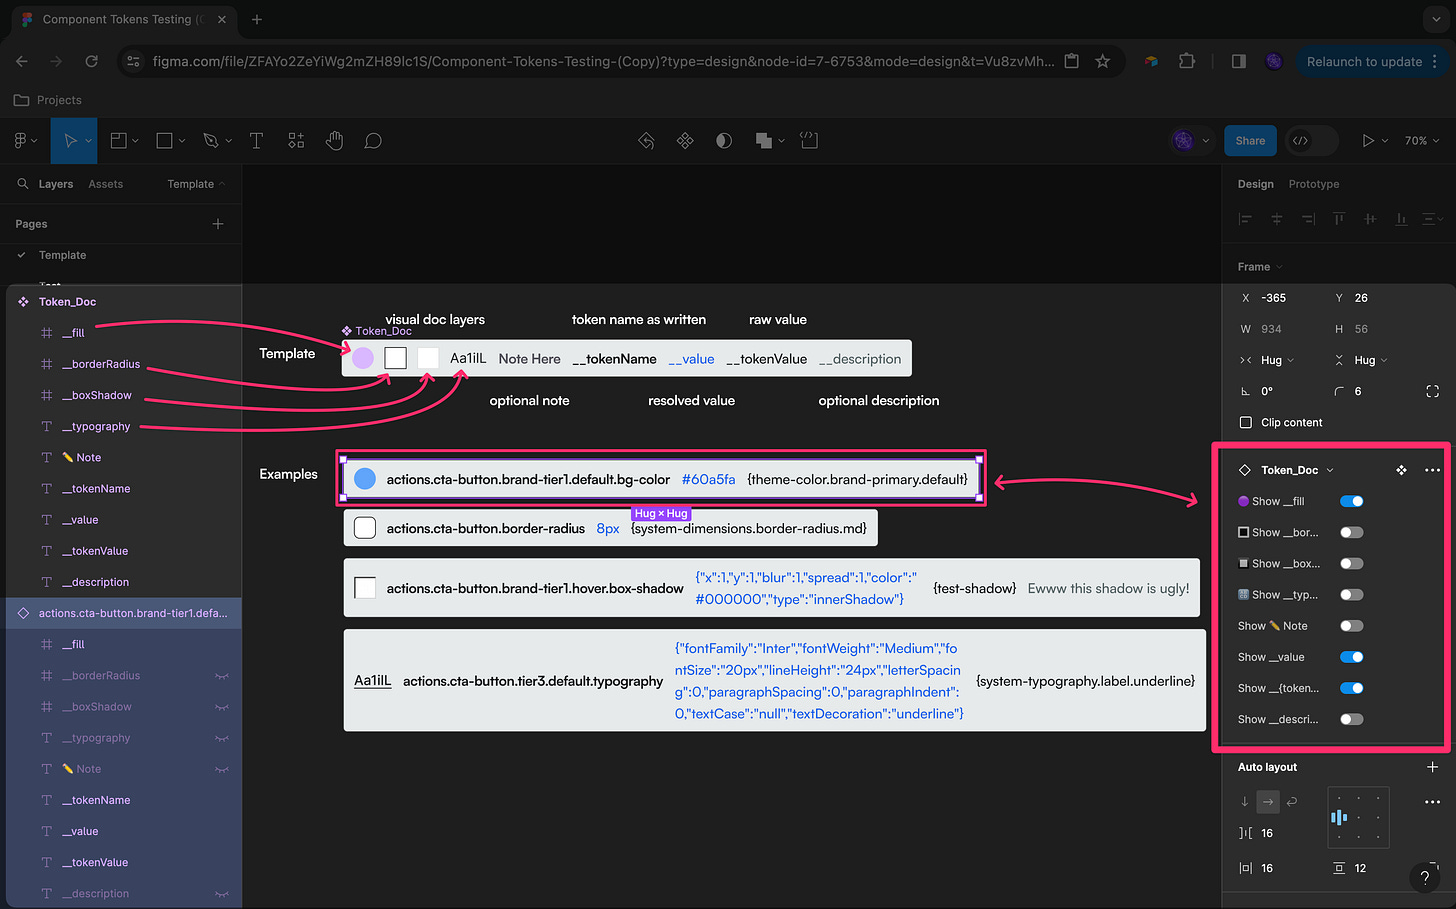
If you are happy with your template and like using components and component properties as a part of your workflow, go for it!
This allows you to customize the styling and bulk edit your templates after Automator has run, saving you time later.
🥳 Congrats! You are ready for part 2 →
I’ll walk you through how to use the templates you created with the Automator script to create and maintain living documentation of design tokens automatically.
🔗 Resources
Tailwind CSS - Figma community file by SamIam_Designs - coming soon




Wow this is impressive and I've tried to leverage Figma as much as possible with the time I have as well. Not to this extent of course, but with the current library I'm using (Prime) this is a total possibility! I've been curious in trying out Supernova to have a documentation tool that is connected to Figma + code as well. Have you explored that at all? (I know you'd have to go outside of Figma to do that lol)